
You are using an out of date browser. It may not display this or other websites correctly.
You should upgrade or use an alternative browser.
You should upgrade or use an alternative browser.
Digital photography analyzing
- Thread starter ThunderFoot
- Start date
ThunderFoot
Scholar
- Joined
- Oct 31, 2007
- Messages
- 109
Duplicate deleted.
Thanx Chill, that was my boo boo yestday.
The Man
Unbanned zombie poster

Some of the tell tail signs of picture manipulation are differences in color contrast and pixel size between elements in the picture. Also when inserting an element into a background picture it is necessary to “soften” the “hard” edges of the inserted element so it blends in better with the background.
The color contrast of the background woods is clearly different from the helicopter and the foreground brush.
By zooming in on the front edge of the helicopter against the background woods, at the pixel level, you can clearly see the difference in pixilation of the helicopter and the background. The larger saw tooth pattern on the edge of the helicopter pixilation as it transfers to the background pixilation is a dead giveaway. Some of the blue pixels from the helicopter’s original background remain and results in a blue haze around the front edge of the helicopter. A better effort should have been made to “soften” the front edge of the helicopter.
Sorry but I do not know how to insert images into a post. You can use MS paint to zoom in on the front of the helicopter.
The color contrast of the background woods is clearly different from the helicopter and the foreground brush.
By zooming in on the front edge of the helicopter against the background woods, at the pixel level, you can clearly see the difference in pixilation of the helicopter and the background. The larger saw tooth pattern on the edge of the helicopter pixilation as it transfers to the background pixilation is a dead giveaway. Some of the blue pixels from the helicopter’s original background remain and results in a blue haze around the front edge of the helicopter. A better effort should have been made to “soften” the front edge of the helicopter.
Sorry but I do not know how to insert images into a post. You can use MS paint to zoom in on the front of the helicopter.
The Man
Unbanned zombie poster
Also the main rotor of the helicopter is clearly visible but where is the tail rotor?
ThunderFoot
Scholar
- Joined
- Oct 31, 2007
- Messages
- 109
ThunderFoot, enhancement is a poorly defined term. In this case it may mean drawing lines on the picture, which is not really enhancing--it's adding information which is not in the original.
Think of a digital picture as a grid of numbers. Each number is a pixel, and corresponds to a certain color. Various techniques for storing the picture (jpg vs. bmp) will mean very different patterns of numbers for what appears to be the same picture.
Various compression techniques are also used. For example, a streak of eight yellow pixels will likely be represented as (8 by yellow) instead of (yellow, yellow, yellow, yellow, yellow, yellow, yellow, yellow). Since there are shades of yellow that are too close to be distinguished by the naked eye, the compression may cheat a little and remove subtle changes.
Standard enhancement techniques rely on these subtle differences. For example, a yellow object in front of a yellow object may be slightly different shades of yellow--too similar to be seen with the naked eye. A typical enhancement would be to measure the average shade of yellow and these two areas and make those pixels that are closer to shade one black and those that are closer to shade two, white. Then the image would show a black object on a white background.
There's lots more stuff along these lines that people can do, but all of it comes down to looking for subtle patterns in the numbers that represent the colors of the image.
I posted this before, but if you really want to try your hand at it, here's a free program that will likely do everything that could reasonably be done.
http://rsb.info.nih.gov/ij/
I am sure that was a very poor way of stateing that phrase. And I am sure as we go through this I will make other "foopas". Please just hang in there with me, I do learn. Sometimes very slowly but I get there, LOL.
That was a wonderful way you explained it and I understand a little more. But right now it’s like teaching collage physics to a kindergarten student.
LTC8K6
Penultimate Amazing

I still can't see the point in asking if the original photo is enhanced...
No one ever claimed it was.
The OP knows the person who made the enhanced version, so why come here and ask us to explain how it was done?
No one ever claimed it was.
The OP knows the person who made the enhanced version, so why come here and ask us to explain how it was done?
LTC8K6
Penultimate Amazing
Also the main rotor of the helicopter is clearly visible but where is the tail rotor?
Spinning too fast for the CCD.
ThunderFoot
Scholar
- Joined
- Oct 31, 2007
- Messages
- 109
Can someone post a link to the "enhanced" photo? I'm not slogging through 11 pages on that other thread. I'm interested in digital photgraphy and its manipulation, not that other subject.
I tried to post the enhanced photograph on here but the file was to large. Again, my skills stand in my way. If someone can do it I would love to have it on here. Please IM me with an e-mail address and I will send it to you.
wahrheit: the exif does seem a little strange but it gives the shutter speed as 1/280 sec.
Also could you tell me where exactly to look for the little guy in the original photograph (haven't see the "enhanced" version)?
At first glance i have to say the original doesn't seem photoshopped. And if it is, then it's a damn good job.
here is the complete Exif:
* Image Description =
* Camera Make =
* Camera Model = CaptureV
* Picture Orientation = normal (1)
* X-Resolution = 72/1 = 72.00
* Y-Resolution = 72/1 = 72.00
* X/Y-Resolution Unit = inch (2)
* Last Modified Date/Time = 2007:04:16 03:56:17
* Y/Cb/Cr Positioning (Subsampling) = co-sited / datum point (2)
* Exposure Time (1 / Shutter Speed) = 10/2800 second = 0.00357 second
* Lens F-Number/F-Stop = 28/10 = F2.80
* Exposure Program = normal program (2)
* ISO Speed Ratings = 100
* Exif Version = 0220
* Original Date/Time = 2007:04:16 03:56:17
* Digitization Date/Time = 2007:04:16 03:56:17
* Components Configuration = 0x01,0x02,0x03,0x00 / YCbCr
* Compressed Bits per Pixel = 2/1 = 2.00
* Brightness (APEX) = 8600/1000
Brightness = 388.02 foot-lambert
* Exposure Bias (EV) = 1/11 = 0.09
* Max Aperture Value (APEX) = 3/2 = 1.50
Max Aperture = F1.68
* Metering Mode = center weighted average (2)
* Light Source / White Balance = unknown (0)
* Flash = n/a (215)
* Focal Length = 82/11 mm = 7.45 mm
* Subject Location = 1024,768,2048,1536 x/y coordinates of center and width/height of rectangle (4)
* FlashPix Version = 0100
* Colour Space = sRGB (1)
* Image Width = 2048 pixels
* Image Height = 1536 pixels
* Image Source = digital still camera (DSC)
* Scene Type = directly photographed image
* Custom Rendered = normal process (0)
* Exposure Mode = auto exposure (0)
* White Balance = auto (0)
* Digital Zoom Ratio = 0/1 = 0.00
* Focal Length in 35mm Film = 0
* Scene Capture Type = standard (0)
* Gain Control = n/a (0)
* Contrast = normal (0)
* Saturation = normal (0)
* Sharpness = (null)
* Subject Distance Range = unknown (0)
* Interoperability Index = R98
* Interoperability Version = 0100
Also could you tell me where exactly to look for the little guy in the original photograph (haven't see the "enhanced" version)?
At first glance i have to say the original doesn't seem photoshopped. And if it is, then it's a damn good job.
here is the complete Exif:
* Image Description =
* Camera Make =
* Camera Model = CaptureV
* Picture Orientation = normal (1)
* X-Resolution = 72/1 = 72.00
* Y-Resolution = 72/1 = 72.00
* X/Y-Resolution Unit = inch (2)
* Last Modified Date/Time = 2007:04:16 03:56:17
* Y/Cb/Cr Positioning (Subsampling) = co-sited / datum point (2)
* Exposure Time (1 / Shutter Speed) = 10/2800 second = 0.00357 second
* Lens F-Number/F-Stop = 28/10 = F2.80
* Exposure Program = normal program (2)
* ISO Speed Ratings = 100
* Exif Version = 0220
* Original Date/Time = 2007:04:16 03:56:17
* Digitization Date/Time = 2007:04:16 03:56:17
* Components Configuration = 0x01,0x02,0x03,0x00 / YCbCr
* Compressed Bits per Pixel = 2/1 = 2.00
* Brightness (APEX) = 8600/1000
Brightness = 388.02 foot-lambert
* Exposure Bias (EV) = 1/11 = 0.09
* Max Aperture Value (APEX) = 3/2 = 1.50
Max Aperture = F1.68
* Metering Mode = center weighted average (2)
* Light Source / White Balance = unknown (0)
* Flash = n/a (215)
* Focal Length = 82/11 mm = 7.45 mm
* Subject Location = 1024,768,2048,1536 x/y coordinates of center and width/height of rectangle (4)
* FlashPix Version = 0100
* Colour Space = sRGB (1)
* Image Width = 2048 pixels
* Image Height = 1536 pixels
* Image Source = digital still camera (DSC)
* Scene Type = directly photographed image
* Custom Rendered = normal process (0)
* Exposure Mode = auto exposure (0)
* White Balance = auto (0)
* Digital Zoom Ratio = 0/1 = 0.00
* Focal Length in 35mm Film = 0
* Scene Capture Type = standard (0)
* Gain Control = n/a (0)
* Contrast = normal (0)
* Saturation = normal (0)
* Sharpness = (null)
* Subject Distance Range = unknown (0)
* Interoperability Index = R98
* Interoperability Version = 0100
ThunderFoot
Scholar
- Joined
- Oct 31, 2007
- Messages
- 109
I still can't see the point in asking if the original photo is enhanced...
No one ever claimed it was.
The OP knows the person who made the enhanced version, so why come here and ask us to explain how it was done?
LTC I am here for my own education in this area with out all the trash that was going on over in the other thread, that's all.
The color contrast of the background woods is clearly different from the helicopter and the foreground brush.
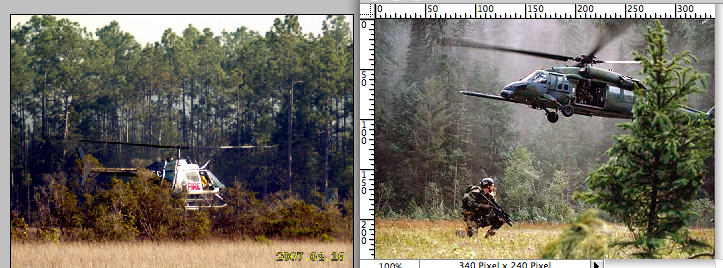
Which is nothing special. The more distant the objects, the more blue they become under most normal light conditions.
No surprise the wood in the background is blueish compared to the foreground.
Like here, for example:
By zooming in on the front edge of the helicopter against the background woods, at the pixel level, you can clearly see the difference in pixilation of the helicopter and the background. The larger saw tooth pattern on the edge of the helicopter pixilation as it transfers to the background pixilation is a dead giveaway.
I'm sorry but I fail to see this, can't find anything special here.
Some of the blue pixels from the helicopter’s original background remain and results in a blue haze around the front edge of the helicopter.
You can see this happen quite frequently with cheapo sensors. The overexposed white "spills" into the surrounding pixels.
Also the main rotor of the helicopter is clearly visible but where is the tail rotor?
I suggest you do a google image search on "helicopter". You will find numerous pictures of in-flight helicopters where you can barely or not at all see the tail rotor. It's too fast for normal shutter speeds.
ThunderFoot
Scholar
- Joined
- Oct 31, 2007
- Messages
- 109
Ok folks, I have to go to work again. The weekends are very busy for me as I am working two jobs on the weekends. I will try to come by as much as possable and keep up with what is going on. PLEASE KEEP THIS ON THREAD!!!!! I don't want to come home and find it has been closed because someone is talking about the other thread and if I can't stop that I have already talked to the mods and this thread will be closed.
I am new to this fourm and have not seen any threads on "Digital Photography" and I could learn a lot from this. Please be kind to each other and have a GREAT DAY.
I am new to this fourm and have not seen any threads on "Digital Photography" and I could learn a lot from this. Please be kind to each other and have a GREAT DAY.
ThunderFoot
Scholar
- Joined
- Oct 31, 2007
- Messages
- 109
Which is nothing special. The more distant the objects, the more blue they become under most normal light conditions.
No surprise the wood in the background is blueish compared to the foreground.
Like here, for example:
[qimg]http://www.internationalskeptics.com/forums/imagehosting/451447347a91c9797.png[/qimg]
I'm sorry but I fail to see this, can't find anything special here.
You can see this happen quite frequently with cheapo sensors. The overexposed white "spills" into the surrounding pixels.
I suggest you do a google image search on "helicopter". You will find numerous pictures of in-flight helicopters where you can barely or not at all see the tail rotor. It's too fast for normal shutter speeds.
The photograph was taken in a marsh area in the panhandle of Florida and may account for some of the contrast in the background trees and the brush in the foreground.
The photograph was taken in a marsh area in the panhandle of Florida and may account for some of the contrast in the background trees and the brush in the foreground.
It doesn't matter much where it was taken. As long as there is air and some humidity, the more blue objects become in the distance.
@ tuc0: Thanks for the additional EXIF, I missed the shutter speed because I looked at a shortened version.
1/280 seems to fit the blur of the rotors. I looked at a couple of images I found that had a helicopter and EXIF data. The blur of the rotors seems to match an exposure time of 1/280.
Anyway, as of now, I have no reason to believe that this image was tampered with.
ThunderFoot,
I can't help with photo analysis as I'm just an amateur who messes about with photos for my own amusement. I would suggest you get hold of a photo editing package and have a play with any old photo just to see the various types of things it is possible to do ... it's good fun ... and I think this would help you understand what the more tech-savvy posters are saying.
In case it's any help this page at the MajorGeeks site has a list of freeware and shareware graphics programs you can download.
Personally, I've used PaintShopPro for years - but only because I originally got a free version off a magazine cover disc, it does what I need and I am too lazy to learn how to use Photoshop.
I can't help with photo analysis as I'm just an amateur who messes about with photos for my own amusement. I would suggest you get hold of a photo editing package and have a play with any old photo just to see the various types of things it is possible to do ... it's good fun ... and I think this would help you understand what the more tech-savvy posters are saying.
In case it's any help this page at the MajorGeeks site has a list of freeware and shareware graphics programs you can download.
Personally, I've used PaintShopPro for years - but only because I originally got a free version off a magazine cover disc, it does what I need and I am too lazy to learn how to use Photoshop.
The Man
Unbanned zombie poster
I suggest you do a google image search on "helicopter". You will find numerous pictures of in-flight helicopters where you can barely or not at all see the tail rotor. It's too fast for normal shutter speeds.
All of the pictures I have seen where the main rotor is visible the tail rotor is visible as well. I just don’t see how the shutter speed could be sufficiently fast to capture the main rotor yet not even show a blur of the tail rotor? If you can give me a link to any pictures like you have described I would be more then happy to capitulate.
All of the pictures I have seen where the main rotor is visible the tail rotor is visible as well. I just don’t see how the shutter speed could be sufficiently fast to capture the main rotor yet not even show a blur of the tail rotor? If you can give me a link to any pictures like you have described I would be more then happy to capitulate.
Actually, you can often see a blurred tail rotor, but only in pictures with a bright background, like the sky.
http://www.mongabay.com/images/grandcanyon/0621_helicopter.jpg
http://ebible.org/mpj/gallery/Helicopter taking off.jpg
Small blur visible:
http://www.phbraasch.de/deutsch/pic/Lfz_Hubschrauber.jpg
Probably not visible in a situation like the OP
http://upload.wikimedia.org/wikipedia/commons/thumb/a/a8/AH-1_Cobra.jpg/800px-AH-1_Cobra.jpg
Also, the main blades of the helicopter in the OP are almost at eye-level with the photographer. Blurring will not be so strong as when you photograph a helicopter in the sky from below. If you look at the OP image, the blade on the right is actually quite blurred. Not as crisp as the one on the left of the picture.
What I find also quite convincing is the blurring caused by the heat of the exhaust pipes. You can see it left of the main rotor axis. That's why I think this is not a photoshop job. If so, it was done by a real pro.
Last edited:
steve s
Philosopher

- Joined
- Feb 16, 2006
- Messages
- 5,865
I just don’t see how the shutter speed could be sufficiently fast to capture the main rotor yet not even show a blur of the tail rotor?
Because the main rotor is coming directly toward the viewer, its position during the exposure doesn't change much. But because the tail rotor is moving perpendicular to your line of sight, its position moves a lot during the exposure.
You can see this for yourself. Take a pencil and quickly wave it up and down in front of your face. It's very blurred. Now wave it to and fro at eye level. Its appearance doesn't change much.
ETA: I'm not even sure what we're supposed to be looking at. Is someone suggesting that a shadow in the woods is Bigfoot? What about all the other shadows in that pic?
Steve S.
Last edited:
ETA: I'm not even sure what we're supposed to be looking at. Is someone suggesting that a shadow in the woods is Bigfoot? What about all the other shadows in that pic?
Don't use the word that starts with "B" and ends with "foot" in this thread, see above. The mods and the OP guy want this to be a digital photo thread, only.
Other than that, your question is of course spot on.
